
Bambu Studio Modifiers: How to optimise your 3D printing exactly where it counts!
Does this sound familiar? Your 3D print looks good overall, but you notice a lack of stability in crucial areas, messy details, or unnecessarily long print times. This is where Modifiers in Bambu Studio come in. This feature allows for the targeted optimisation of specific parts of a model rather than applying the same settings to the entire object. Whether you want to increase infill, reinforce walls, or place supports only where they are truly needed, Bambu Studio modifiers offer full control. They help to improve quality, stability, and efficiency simultaneously.
When should modifiers be used in the slicer?
Modifiers are a genuine game-changer for everyday printing. If a component has high-stress areas, the infill or wall thickness can be increased specifically in those zones. For finer details at the top of a model, speed or cooling can be adjusted using a modifier. This approach combines stability and quality without compromise. Bambu Studio modifiers are among the most powerful tools in the slicer for anyone looking to truly optimise their prints. Instead of using a single setting for the entire object, multiple printing strategies can be applied within a single model.
How do modifiers work?
Applying modifiers is simpler than it might seem. A modifier, such as a cube or cylinder, is added to the model and placed over the area requiring adjustment. The desired settings are then defined. Everything located within this designated area will be modified accordingly.
It is important to note: Settings defined within a modifier always take precedence over global print profiles. This means adjustments to infill, wall thickness, or speed only apply to the defined area and overwrite standard values. Individual zones of a model can be optimised while the rest is printed using your usual settings. It is a straightforward and effective process.
Practical tips
To get the most out of Bambu Studio modifiers, it is worth keeping a few points in mind.
Use modifiers purposefully and avoid cluttering the model with too many different zones, as this can make the project difficult to track. Always use the preview after slicing to check that the adjustments are applied exactly where intended. This can make a significant difference, especially with complex models. Furthermore, only optimise the areas that truly require it to save material and keep print times to a minimum. With a little practice, using modifiers becomes intuitive, leading to more efficient and higher-quality 3D prints.
Conclusion: Small changes, big results
Modifiers primarily offer greater control. The user decides where stability is required, where speed is a priority, and where detail is essential. This leads to significantly better results, particularly for functional prints or complex models. To maximise the potential of a setup, integrating modifiers into the Bambu Studio workflow is highly recommended. They are the key to better, more efficient, and smarter 3D printing.
Related products
-
-
-
-
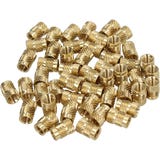
3DJAKE Threaded Inserts (50-piece set), M3 x 5.7 mm (50 pcs)
- Special shape for a perfect hold
- Easy installation
- Insert for various plastic parts
Magazine Articles:
- Snapmaker U1: The Tool Changer for Multi-Material 3D Printing
- YouTube Episode: Are You Breathing 3D Printer Fumes? Bambu Lab Upgrade!
- YouTube Episode: Anycubic Kobra S1 Review – A True Bambu Lab Competitor?
- YouTube Episode: This Part Is Strong And Stiff....But Hollow!
- YouTube Episode: Reverse Engineering Home Gadgets
Discover 3DJake:
-
Great Britain: Free standard delivery from £69.90
-
Free
returns More than 10.450 products
We deliver worldwide to
more than 40 countries
