
The new BIQU B1 - Competition for the Ender 3?
Unpacking and assembly
If you open the package and remove the top foam cover, you immediately notice the interesting colour of some of the aluminium components. The manufacturer's blackberry-pink colour choice is definitely something different. We will find out whether the components will also be available in other colours.
In any case, the parts are neatly packaged and the labelling of the small parts is okay. Each plastic bag describes which part it is and at which step in the operating instructions the part is used.
So spread the parts out on the table, unfold the assembly instructions, which are currently only in English, and off you go.
Unfortunately, BIQU already built an error in step 1. After an unsuccessful attempt to connect the heating bed cable to the terminal, it quickly becomes clear that the cable colours are incorrectly described in the operating instructions. The plug should be inserted with the red cable on the left and not on the right as described.
Step 2 goes without problems and in step 3 you should make sure that the small thread in the aluminium extrusion profile is on the right side. The Z-axis limit switch will later be attached to this thread.
Then it goes to step 5 without any problems. In this step the coupling between the Z-axis stepper motor and the spindle is mounted. The grub screws of the coupling are a little too short to be firmly attached to the shaft of the stepper motor - which is flattened on one side. The coupling could only be fixed with 1 screw.
In step 7, only a small red arrow on a tiny picture mentions that it is time to attach the left bracket for the X-axis to the aluminium profile. Anyone who overlooks this can enjoy additional screwing work.
The rest of the construction then runs smoothly and only the components that have to be fastened with the sometimes very stubborn and small aluminium profile nuts require a little patience and instinct.
For beginners who have never assembled a 3D printer, a very essential step is missing in the operating manual. After assembly, all screws (including those of the already assembled parts) should be checked and tightened. Screws that loosen during shipping are very often a source of printing errors.
Furthermore, it is unfortunately not mentioned that the rollers of the moving components still have to be adjusted by means of the eccentric nuts. However, this step is also essential to achieve a decent print result.
After checking the screws and adjusting the rollers, manual bed leveling takes place as described in the instructions. This process is well described and thanks to the large adjustment wheels on the print bed, leveling is easy and uncomplicated.
First test print
For our first print test, we decide to print the “Little Bear” model stored on the supplied SD card in a colour that matches the design (3DJake ecoPLA Glitter Purple).
The distance between the housing and the card reader module of the motherboard is so large that the card can fall into the terminal housing instead of landing in the module. It would be desirable if BIQU could improve this.
Good, so the terminal screwed on, the SD card taken out and inserted into the slot to the right of the control button with the precision of a surgeon.
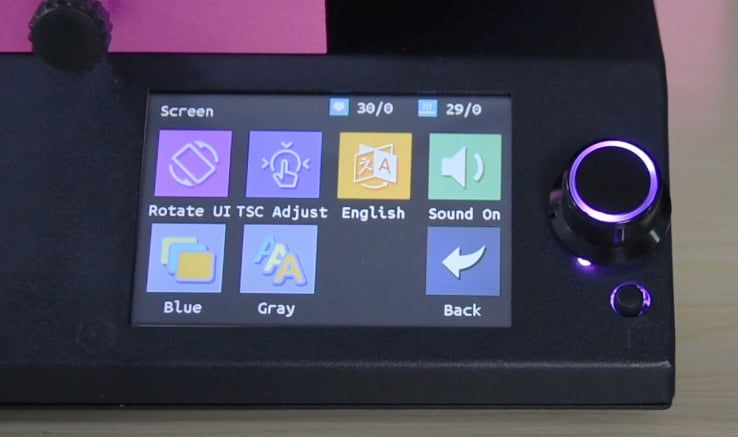
Menu navigation
The structure of the menu - which is operated via the very responsive touchscreen - is very intuitive and clear. Choosing which file to print takes just a few steps. Before printing, the printer can be preheated to the right temperature for the material. You can choose whether you want to heat up the print bed and nozzle one after the other or both at the same time.
We opt for the latter and both the nozzle and the print bed reach the temperatures in a very short time.
Then select the file to be printed in the main menu under Print-> TFT SD (this is the slot to the right of the round control button) and off you go.
The print
During printing, the loudest noise is made by the fan. Overall, the printer runs very quietly and is very quiet compared to similar devices from other manufacturers.
The most important parameters can also be changed during printing via the menu.
The pause function works perfectly and an interruption in printing is not visible on the finished model.
Another useful function is the “BabyStep” menu item. This allows you to change the distance between the nozzle and the model during printing. This is particularly useful for the first layers in order to achieve optimal adhesion or during printing if the nozzle “scratches” the model.
Another feature is the switchable LED lighting of the hotend. The menu can be used to switch between blue, red, green and white colours. It's not a productive feature, but it looks cool.
After about 1 hour our “Little Bear” is ready and the result is impressive. The model has no defects and the layers are almost invisible. Since the print worked very well, we are now testing the printer with a Benchy.
In order to be able to use the BIQU B1 with the Cura slicer software, the printer must first be created. The process for this is very well described in the electronic version of the operating instructions on the supplied SD card.
For testing we use the Benchy model from 3dbenchy.com with the profile settings for Draft (0.2mm layer height). We only increase the printing temperature from 200 ° to 210 ° in order to achieve an optimal printing result with our 3DJake ecoPLA Glitter Purple.
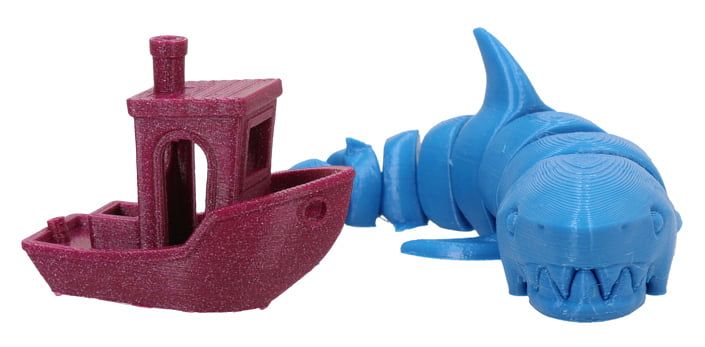 After 1 hour and 5 minutes we have the result in hand. The printing result is more than satisfactory. The Benchy has no faults and the dimensions are met very precisely, taking into account the material shrinkage of PLA.
Now that we have a boat, a shark cannot be missing. We print this with 3DJake PETG at 240 ° hotend and 70 ° print bed temperature. After 2 hours this is also ready and the quality is convincing.
Conclusion
The BIQU B1 can certainly assert itself as a competitor to the Ender 3 from Creality. The weaknesses of the BIQU B1 are mainly the operating instructions, the inferior stepper motor coupling and the large distance between the card reader and the housing.
Despite these shortcomings, the BIQU B1 is better than the Ender 3 in some areas. The B1 is already prepared for the auto-levelling module from Antclabs - the BL Touch. The BL Touch only needs to be installed using the bracket supplied, plugged into the terminal and activated in the menu. The print quality was also absolutely convincing. Without any additional settings, our B1 delivered perfect results right from the start.
PROS
- Easy assembly
- Terminal with integrated electronics
- Prepared for BL Touch auto levelling
- Large touch screen
- 32-bit motherboard
- Low-noise printing
- Stable design
- Intuitive menu
- Very good print quality
- Many settings options via menu
- Hotend with LED lighting
- Build space of 23.5 x 23.5 x 27cm
- Good adhesion of the magnetic surface
CONS
- Instructions should be more detailed
- Defective Z-coupling
- SD cards can fall into the terminal housing
The defective Z-coupling as well as the placement of the SD card slot were of course reported by us to BIQU and have been repaired and adjusted for later versions.
Materials and models used:
Little Bear from BIQU
3DJake ecoPLA Glitter Purple
Hotend: 210 ° C
Print bed: 60 ° C
Benchy Boat
http://www.3dbenchy.com/
3DJake ecoPLA Glitter Purple
Hotend: 210 ° C
Print bed: 60 ° C
Articulated Shark
https://www.thingiverse.com/thing:3845304
3DJake PETG Sky Blue
Hotend: 240 ° C
Print bed: 70 ° C
Latest reviews
-
-

-
Extrudr PETG Black, 1,75 mm (1.100 g)
- 100% recyclable
- Diverse area of application
- Heat resistant up to approx. 90 °C
-

Magazine Articles:
Discover 3DJake:
-
Great Britain: Free standard delivery from £69.90
-
Free
returns More than 10.400 products
We deliver worldwide to
more than 40 countries
