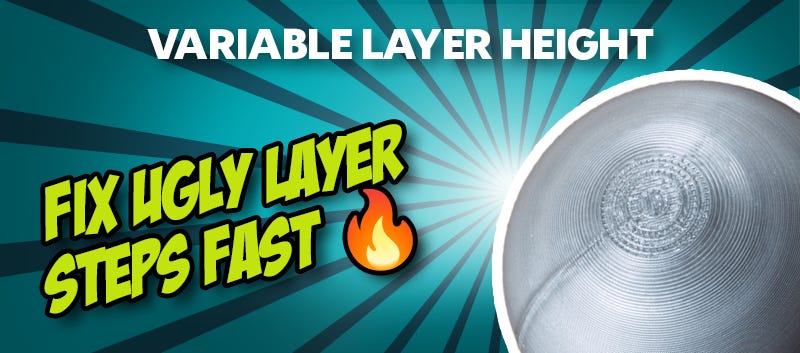
Variable Layer Height in 3D Prints: How to Avoid Unsightly Layer Steps
You’ve printed a model with beautiful curves, you take it off the build plate, and then you get a rude shock: instead of a smooth surface, there are clearly visible steps. These so-called "layer steps" in 3D printing are a real nuisance, especially on curves and sloped surfaces, making even high-quality prints look jagged and unfinished.
This problem is particularly noticeable with figures, organic shapes, or rounded components. Many people try to fix this by reducing the overall layer height. While this works, it has one major drawback: print time increases massively. The better solution is much smarter: Variable Layer Height.
Why do Layer Steps occur in the first place?
In FDM 3D printing, your model is printed layer by layer, with each layer having a fixed height. While this is barely noticeable on straight vertical walls, a "staircase effect" occurs as soon as curves or slopes come into play. This happens because the printer can only replicate rounded shapes using small, flat increments. The greater the layer height, the more prominent these steps become. This is exactly why many prints appear "blocky" or "jagged" on curved surfaces, even when the original digital model is perfectly smooth.
Variable Layer Height: The smart solution for smooth surfaces
With Variable Layer Height, your slicer automatically adapts the layer height to the geometry of your model. Instead of using the same layer height everywhere, the following happens:
- Fine layers for curves and intricate details
- Thicker layers for straight, vertical sections
- An optimal balance between quality and speed
For complex models, this is a total game-changer. You achieve the high-definition detail of a fine-layered print without the massive time penalty of printing the entire object at a slow pace.
How Variable Layer Height works
The technology behind it is relatively simple yet effective. The slicer analyses your model and identifies areas where high detail precision is required, automatically reducing the layer height there. In less critical areas, such as straight walls, the layer height is increased to save time. The result is a dynamic printing process that adapts to your model.
Many modern slicers, such as PrusaSlicer, Cura, or Bambu Studio, already support this function. Often, you can activate it with just a few clicks or even fine-tune it manually.
When is Variable Layer Height particularly worthwhile?
The Variable Layer Height function shows its strengths primarily with specific model types. It is particularly useful for:
- Rounded or curved surfaces
- Figures and miniatures
- Organic shapes
- Sloped surfaces
- Visible design objects
If, on the other hand, you are printing purely functional components with straight surfaces, Variable Layer Height offers fewer advantages.
Common mistakes and misunderstandings
A common misconception is that a lower layer height is always better. This isn't strictly true. Without Variable Layer Height, this often just leads to unnecessarily long print times. It is also important to mention that this function is no substitute for proper basic calibration. If your print has general issues, even Variable Layer Height won't deliver perfect results. In that case, you’ll need to troubleshoot elsewhere.
Conclusion: Higher quality without the extra effort
If visible layer steps are a problem, you don't have to resign yourself to extra-long print times. Using Variable Layer Height gives you high-definition detail exactly where you need it, while saving time wherever possible. The result is visibly smoother surfaces, finer details, and more efficient prints. This function is the ultimate hack when it comes to curved models!
Latest reviews
-
-
Spectrum FlameGuard ASA 275 Polar White, 1,75 mm / 1000 g
- Self-extinguishing properties meet UL94 V0 standards
- Improved mechanical properties
- UV & weather resistance
-
The Filament ASA Midnight Black, 1,75 mm / 1000 g
- UV-resistant & weatherproof
- Excellent thermal resistance
- Good mechanical properties
Magazine Articles:
- Entry-level FDM 3D printers under €300! (2025 Edition)
- Improving Small Text in 3D Printing: Achieve perfectly clear & legible text at last!
- Having trouble removing PETG supports? With the PLA trick you can get them off quickly!
- YouTube Episode: 3DJAKE Tabletop Resin
- YouTube Episode: From Physical to Digital: Budget 3D Scanner Battle Royale!
-
Great Britain: Free standard delivery from £69.90
-
Free
returns More than 10.650 products
We deliver worldwide to
more than 40 countries
